
In my last post on Lopi sweater knitting, I explained how I chose my size for the body, based on the math from my sleeve swatches. Today I’m going to talk about how you can plan ahead to get a custom fit for your Lopi sweater.
To thine own self be true
The first step to creating a custom fit for any garment is to know what you like. Do you prefer oversized silhouettes? Sweaters that hug the body? Somewhere in between? How long do you like your sleeves? Do you have a preferred style of sleeve? (File under: things that should have maybe been figured out sooner, but I’m making a point here.)
Sweater patterns at their very core are simply guidelines. They are the roadmap for how one knitter achieved a particular piece. There are no craft police who will come after you if you change things to fit your personal style.
These changes can be miniscule, such as a different cast-on method. They can be immense, such as a dramatic change in yarn weight. All of these edits have their pros and cons, and you can really only determine what you prefer by trying things out. So feel free to deviate from the guidelines when you want!
There’s also nothing wrong with following said guidelines to the letter. My point is simply that I want everyone to know they have options.
Custom fit choices you might make with Sing Winter
I’m speaking specifically to the Sing Winter pattern that I’m using for this project. You can take these ideas and run with them in other patterns if you’d like.
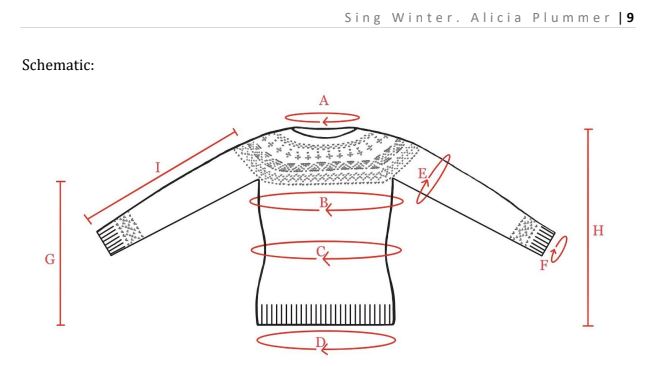
Sing Winter is written with waist shaping. Decreases are made slowly after working the bottom hem, and then the body is increased again for the chest. The result is an “hourglass” shape to the sweater body.
If you don’t want an hourglass shape…
Option 1, straight body: simply work even from the cast on up to the arms. Make a note to switch to larger needles after working the ribbing and work in stockinette stitch for 20″ (or desired length; that number comes from the schematic in the pattern). Then work that part that says “Fourth round” and tells you how to separate for the sleeves (making sure you adjust the numbers if you’ve changed up your sizing).

Option 2, slightly A-line body: I want a more relaxed fit throughout, so I’m casting on 192 stitches. To do this, I will work very slow decreases to get to 184 stitches before separating for the sleeves. If you wanted a more dramatic A-line, you could cast on more stitches.
If you want to custom fit an hourglass shape…
Very simply, just knit the pattern as written. I will make one suggestion, and that is to compare the placement of the waist shaping with your actual waist. Hourglass shaping is intended to sit at the narrowest part of your torso, which is wildly variable from person to person. Spend some time determining where you want the waist shaping to sit on your body. This guide is intended for sewists, but it explains measuring your waist length.
All that means is you may want to move the waist shaping up or down. To do so, change the number of “work even” rounds between decreases and increases. As written, the decreases are worked every 11 rounds and the increases every 8.
Keep on keeping on
Life has been super busy lately and I haven’t yet had a chance to start on the body of my sweater. Add to that, I had to jump on making a child’s sweater as a holiday gift. (“Had to.”) But I know once I get going it will be a quick knit.
All of this to say, there are no rules as to how quick one has to knit anything when it’s for fun. If you’re feeling overwhelmed by a knitting project, you can pare it down to “knit one row/round a day.” Or take a break from it completely until you have more headspace for it.
Yes I am largely reminding myself of these things. But I think we all need that reminder now and then.
